

How To Set Up A Gas Log Fireplace
How to Install a Gas Fireplace
Consummate DIY instructions for installing a directly-vent gas fireplace
![]() Time
Time
Multiple Days
![]() Complexity
Complexity
Advanced
![]() Cost
Cost
$501-1000
Introduction
Enjoy the condolement and ambiance of a crackling burn down on a cold winter'south dark. Here we'll evidence y'all how to install a gas fireplace. Don't worry well-nigh installing a chimney. You don't need i. Yous simply vent the fireplace out the side of the house. Once the fireplace is installed, you simply flip a switch to first a roaring fire.
Tools Required
Materials Required
- 1/2x48x96 drywall
- 100-grit sandpaper
- 2x10x12' lumber (2)
- 3/4x4x4' plywood
- ix" vent pipe
- Acrylic caulk
- Corner beads
- Gas fireplace
- Heat shield flashing
- Interior firestop
- Joint compound
- Metal baste cap
- Metal nail plates
- Paint or textured finished
- Polyurethane caulk
- Silicone caulk
- Direct pipe
Choosing a Gas Fireplace
It's difficult to shell a crackling wood burn down on a dank night. Only modern gas fireplace come pretty shut, and without the drawbacks of wood. Non only does gas burn much cleaner, making information technology a better choice for the environment, merely there are no messy logs to bear through the house or ashes to clean out. And lighting the fire is as uncomplicated as flicking a switch or turning a valve.
A direct-vent gas fireplace doesn't demand a chimney. Rather, yous tin run a special vent to the outside through an exterior wall. This process is simple and burn down-safe every bit long as you follow the manufacturer'southward directions. Be sure to read them carefully, because they might differ slightly from what we evidence here. For fire safety, however, make sure to heed the manufacturer's directions on clearances for combustibles.
Cost to Install a Gas Fireplace
Wondering how much does it toll to install a gas fireplace? If y'all have some carpentry and drywalling experience, you lot shouldn't have whatever trouble finishing this project. The fireplace volition accept y'all nigh a day to install. So plan to spend an entire weekend framing and installing drywall and a few hours each day for the residue of the week troweling on additional coats of articulation compound. The following weekend you lot can prime the walls and apply the texture.
- The straight-vent fireplace and vent parts we purchased cost usa near $1,800. For $650 more, our fireplace dealer would have installed the fireplace, not including the gas and electrical hookups or any interior finishing.
- The materials for the wood framing, drywall and stucco blanket cost an additional $175. Hire a plumber to run the gas line during the framing process and connect it to the fireplace ($250 to $500).
In addition to a basic set of hand tools, you'll need a circular saw and a drill. A ability miter box is handy merely not necessary for cut the angles on the framing parts. You'll need a tin snips for cut the metal corner bead, a collection of taping knives (2-in., 4-in., six-in. and 12-in.) and a mud pan for applying the joint compound and texture.
Shopping for a Gas Fireplace
The fireplace we're using, and the type we recommend, is a direct-vent fireplace. This type draws air from outdoors to feed the flame. Not just is this setup more efficient because you're not losing valuable heated air up the chimney, it's safer too because information technology profoundly reduces the possibility of dangerous carbon monoxide backing up into your home.
The best identify to shop for fireplaces is at fireplace dealers that accept showrooms with working models on brandish. You'll be able to see how the bogus logs wait when they're burning and selection a fireplace way you similar.
Make Sure You Take Proper Venting
Adding a fireplace to a house is a complex project, simply you can do it yourself. Proper ventilation is essential for a prophylactic-operating fireplace.
Projection pace-by-step (22)
Stride one
Build a Mockup To Observe the Best Position
Mock up the fireplace using the dimensions given in fireplace brochures and outline the hearth shape with masking tape. Your new fireplace volition take a major impact on your room. Build a simple mock-up to get a feel for the amount of infinite it takes up and to meet how the angled placement volition affect furniture arrangement and traffic patterns.
When you're satisfied with the aesthetics of the fireplace, turn your attention to the mechanical requirements. You'll need to run a gas supply line for the fireplace. Phone call in a plumber to program the route before you order the fireplace.
Nigh gas fireplaces don't require electricity to operate. However, if you lot ever make up one's mind to add a blower to increase heat output or a hand-held remote command, you lot'll have to connect the fireplace to an bachelor electric circuit, so run a wire to the fireplace while it's accessible.
In addition, since electrical codes don't allow you to merely cover a box that contains live wires, you'll accept to disconnect or relocate any boxes or receptacles that will be covered by the new fireplace.

Step 2
Get the Gas, Electrical and Vent in Identify First
Determine how you'll get the vent from the fireplace to the outdoors. Thanks to the ingenious 2-layer design that keeps the outside of the piping relatively cool, the vents from direct-vent fireplaces tin can run direct out through the wall or up through the roof, allowing great flexibility in pattern and placement of the fireplace. Even so, in that location are very specific requirements that your fireplace and vent installation must meet. Cheque the installation manual to brand certain. Here are a few key points to look for:
- Clearances from the fireplace box to surrounding walls and to the woods framing. Ours required 1/2 in. on the sides and back and three-1/ii in. on meridian.
- Distance the vent must be kept from insulation, wood and other combustibles. Sometimes metal shields must be used over the top of the vent to divert the estrus.
- Maximum number of bends in the vent pipes and the relationship of horizontal to vertical lengths of pipes. Our manual had many illustrations with dimensions to help with the venting layout. You can enquire the dealer for help with vent design.
- Distance the vent cap must exist kept from windows, doors, corners and other elements at the signal where information technology leaves the firm. Measure out where the vent pipage will come out and brand sure information technology meets the specifications.
- And before you lot brainstorm, contact the local building inspections section to obtain the permits required for a fireplace installation.

![]()
Step 3
Build a Fireplace Platform
- Cut 2x10s and blast them together to create an 11-1/2 in. tall platform the shape of the fireplace.
- Smash 2x4 cleats to the bottom.
- Cut iii/iv-in. plywood to fit and spiral information technology to the acme.

Step iv
Set the Fireplace in Position
- Set the fireplace on the platform and slide it into position.
- Then apply a pencil-width bead of sealant to the starting collar of the fireplace.
- Apply the sealant recommended by the manufacturer, usually stove cement or high-temperature silicone caulk.

Stride 5
Install the Kickoff Vent Pipage
- Slide the beginning vent pipe over the starting neckband and lock it in place co-ordinate to the instructions.
- If your fireplace requires a gasket to seal the joint between the vent and fireplace, make sure it's properly positioned. (Ours required the braided rope gasket shown.)

Step 6
End the Vent Pipe
- Connect the 90-degree elbow and a nine-in. straight section to the starting time vent piping. They should meet the exterior wall at a 90-degree bending.
- Trace a circumvolve around the pipe on the wall.
- Using the interior firestop for reference, mark a 12-in. square on the wall. Our square is centered i in. above the center of the vent piping.
With the preliminaries out of the way, here's how you proceed.
- First order the fireplace and vent parts.
- When you know the delivery engagement, schedule the plumber and electrician to prove up a few days later. This will requite you time to accurately lay out the fireplace location on the floor, build the platform and run the vent.
- After the gas line and wiring are done and all inspections are completed, you'll build the frame, embrace information technology with drywall, and complete the taping and decorating.

Step 7
Punching Through the Wall Is the Tough Part
- Cut out the 12-in. square hole with a drywall saw and wait for obstructions.
- If in that location's a wall stud in the way, cut out the drywall between the two closest studs and virtually 9 in. above the foursquare opening.
Caution: Go on the saw blade shallow to avoid cutting hidden electrical wires.

Step 8
Frame the Opening
- Cut out the wall stud and add a double 2x6 header.
- Support the header with trimmers screwed to the existing studs.
- Notch for electrical cables if necessary. (A metal blast plate is required if the cable is closer than 1-one/iv in. to the face of the framing.)
- Frame the 12-in. opening.
- Drill a three/8-in. hole through the wall at each corner to transfer the location of the opening to the outside.

Pace nine
Remove the Siding
- Connect the four holes with lines and cut out the 12-in. opening in the siding and sheathing.
- Marking some other square opening the size of your outside firestop and cap, and cut through the siding only.
- Finish the corners with a utility knife or chisel. Vinyl, aluminum, stucco and brick siding require different techniques.

Step 10
Install the Interior Firestop
- Replace the insulation and drywall, reusing the onetime piece if possible.
- Seal the drywall seams with caulk and identify a bead of caulk effectually the opening.
- Press the interior firestop into the caulk and screw it to the wall.

Stride xi
Caulk the Firestop
- Complete the vent past sliding a section of pipe through the firestop from the outside.
- In our case this pipe was role of the telescoping exterior firestop and cap.
- Then seal the gap between the vent and the interior firestop with loftier-temperature silicone caulk.

Step 12
Install the Vent
- Slide the combination firestop and vent termination into the telescoping section.
- Spiral the firestop to the wall and seal information technology with caulk.
- If your cap has a built-in baste cap that prevents you from sliding it in, cut it off and slide a pre-bent drip cap under the siding as shown.

Step 13
Run Electric and Gas Lines
- Fine-melody the position and levelness of the fireplace and spiral the platform to the floor.
- Relocate electrical boxes every bit needed and run a new electrical line if y'all intend to install the optional fan or remote command.
- Run the new gas line.
- Screw wood backing between the studs to secure the environment as needed.

Step fourteen
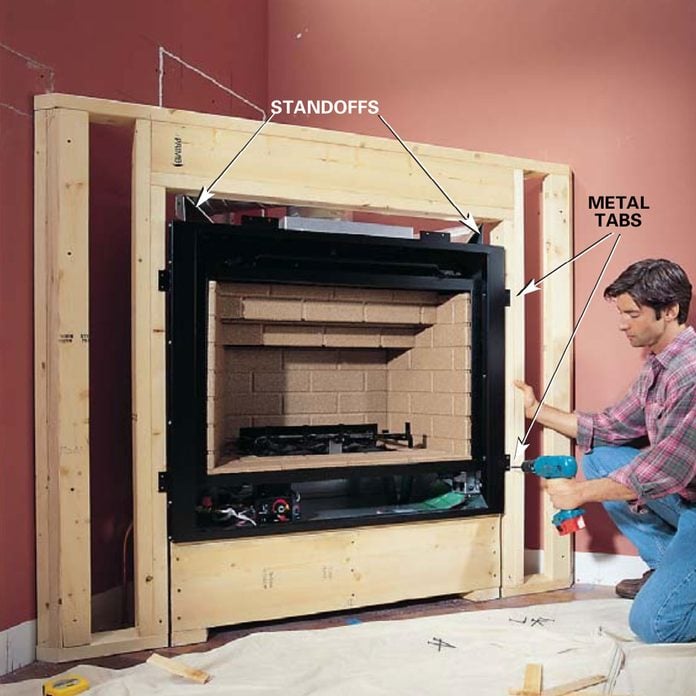
Build the Wall Surrounds
- Build the wall that surrounds the fireplace using Fig. A equally a guide.
- Allow 1/ii in. of space between the wood framing and the fireplace on both sides.
- Screw the metal tabs on the fireplace to the wood frame to secure information technology.
Notation: You can download and print Figure A from the Additional Information section below.
Stride 15
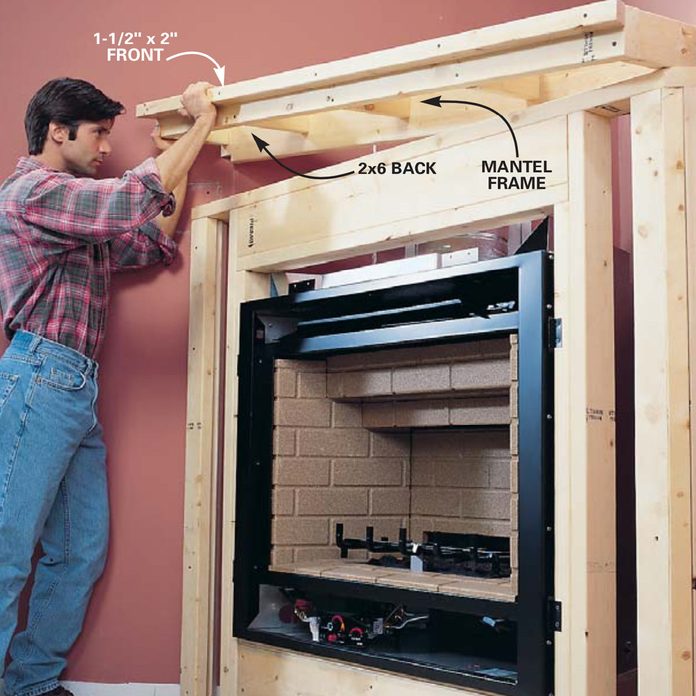
Build the Mantel
- Preassemble the mantel frame and slide information technology into position.
- Screw through the 2x6 from the backside to secure the mantel.
Step 16
Finish Assembling the Mantel
- Miter brusk framing members to complete the angled ends of the mantel and attach them with screws.

Pace 17
Build the Hearth
- Construct the hearth of 2x10s covered with two layers of 3/4-in. plywood.
- Cutting the plywood to shape offset and apply it as a blueprint to build the 2x10 frame.
- Support the inside border with 2x4s screwed to the framing.

Step 18
Build the Columns
- Build the columns according to Fig. A and screw them to the framing.
- Then cover all wood surfaces with drywall fastened with 1-1/4 in. drywall screws.
- If your fireplace is a unlike size from ours, you'll take to adjust the wood framing dimensions.

Step nineteen
Blast on the Corner Bead
- Cover all the outside corners with metal drywall corner bead. Where 2 or more corner beads come across, cut angles on the ends to form a betoken.
- Nail the beads with 1-one/4 in. ring-shank drywall nails every 12 in. forth the bead or more often if needed.
- Employ special 120-degree metal bead to cover the angles that are greater than 90 degrees.

Step 20
Record the Joints
- Apply paper tape embedded in a layer of drywall joint compound to joints without corner dewdrop.
- Fill the expanse between corner beads with articulation compound.
- Sand the corners and joints smooth with 100-grit drywall sanding paper.
- Because of shrinkage, the taping and filling process requires at to the lowest degree 3 coats, with drying fourth dimension in between, then exist sure to let a few days to finish.

Pace 21
Premixed Texture Make You Experience Like a Master Plasterer
Nosotros decided to utilize a sandy, plaster-like finish to the drywall on our fireplace. There are a dozen means to attain this look. We chose an acrylic-based product manufactured by USG that's typically used as an outside terminate. The USG Outside Textured Stop is bachelor in v textures, from fine to fibroid, and 25 standard colors.
Troweling on the texture is a messy operation, so mask off the walls and floor and put on some old clothes earlier yous offset. Offset prime number the walls with a tiptop-quality drywall primer. When the primer is dry, use a wide trowel to spread a thin layer of the premixed texture over an entire section, stopping at a breaking signal like a corner.
- Prime number the walls, then trowel on a layer of premixed acrylic stucco texture.
- Press the trowel firmly confronting the wall. Encompass all of one section.

Footstep 22
Requite the Stucco Texture
Next yous'll float the expanse to impart texture and smooth out the trowel marks. If you're working in hot, dry weather, start floating immediately. Otherwise you lot may have to let the texture mix prepare for a few minutes.
You'll have to experiment a little to see what works. We used a square of extruded polystyrene foam insulation to bladder the texture, but a grout float, wooden block or hard plastic trowel also will work. Each tool gives a little dissimilar texture. Exercise on a large scrap of drywall to get a feel for the fabric and refine your floating technique. Work from the tiptop down to avoid splattering on completed texture.
- Rub cake of foam insulation in small-scale sweeping arcs over the compound to impart a stucco-similar texture.
- Occasionally clean off texture that builds up on the block.
- Cut a 45-degree angle on a cake to attain into within corners.
- Clean up spills and splatters with water before they dry out and occasionally clean your tools and float in a bucket of water to avoid a buildup of dry out texture mix. So move on to the next section.
- If you lot do mess upwards a section, information technology's no big deal—only scrape it all off earlier it dries and start over with fresh texture mix.
- When the texture is dry, usually overnight, you can assemble the log gear up and low-cal the fireplace. Follow the manufacturer'southward instructions for the exact process.
- If necessary, ask the plumber to help y'all light the pilot and burn down up the burner.
- The aroma of burning oil will go away once the manufacturing plant residue burns off.

PDF Links:
- Effigy A: Fireplace framing
Originally Published: January 06, 2022
Source: https://www.familyhandyman.com/project/how-to-install-a-gas-fireplace/
0 Response to "How To Set Up A Gas Log Fireplace"
Post a Comment